


Every application would consist of buttons and it is one of the most common ways to enable interactivity to application. HTML has provided us with the button tag which can render an element which is clickable. By default, all the browsers have their own default styles for the button element.
Why Design Systems exist?
Design systems are a set of standards that are defined so that the product or app that we are building will have a certain level of consistency. Consistency is a key factor when building applications that will be used by hundreds or thousands of users.
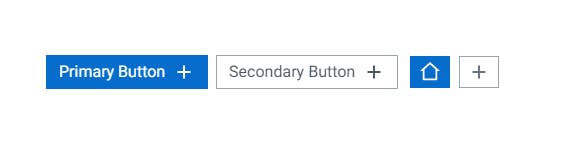
 (Something which I build using the directive approach for buttons)
Design systems are well designed and documented and can be very exhaustive in nature. Not all the companies or applications that we see have a design system they are following. But most of the larger players has their own design systems. To name some:
- Material Design by Google
- Human Interface Guidelines by Apple
- Polaris by Shopify
- Fluent by Microsoft
- Lightning by Salesforce
and many more.
Bringing consistency to your Angular projects
There are a lot of ways to bring consistency to your applications. If you are building an application and not using any 3rd party design system, often you would end up with discrepancies in your applications.
The buttons used on one page of the application will be looking a bit different from other parts of the application. You can avoid things like this if you structure your styles and components properly.
Styling HTML elements is not an easy task. In fact, most of the developers out there would say they find it difficult to get the styles straight.
Solving the problem
The most common approach one would take is to create a class and then style it in the styles file. This is the easiest way to make things consistent. But if you didn't properly structure your styles, at some later point of time it can cause issues.
We would normally do something like this:
<button class="button button--primary"></button>
.button{
    padding: 0.5rem 1rem;
    color: #000;
    &-primary{
        background: blue;
    }
}
So what we are going to do today is to extend how we use classes to styles the buttons. Instead, we will create directives and then completely abstract the classes from the button.
This would make the code look cleaner, at the same time it's much more modular and reusable.
Creating directives to style buttons
For the purpose of this post, I am going to create styles for two buttons: A primary button and a Secondary button.
Create the required classes in styles file
I like to separate the styles of common components into separate files so it will be easy to maintain.
Create a button.scss file with the below styles in a folder. You can then import the button.scss file to the styles.scss file.
.button{
  padding: 0.5rem 1rem;
  border-radius: 0.4rem;
  color: #444;
  border: 1px solid transparent;
  &--primary{
    background-color: var(--primary);
    color: #fff;
  }
  &--secondary{
    color: var(--primary);
    border-color: #333;
  }
}
Create a module for the buttons
Creating a module for buttons would help us maintain the code a bit better. Modularity is always a key point when developing any kind of application. Create a common components folder and create a button module inside it.
import { NgModule } from '@angular/core';
import { PrimaryButtonDirective } from './button.directive';

@NgModule({
  declarations: [PrimaryButtonDirective, SecondaryButtonDirective],
  imports: [],
  exports: [PrimaryButtonDirective, SecondaryButtonDirective],
})
export class ButtonModule {}
I have declared and exported two directives from the module. We will be creating the directives in the next step. Basically, when you want to use the buttons directive in any of your components, we need to import the ButtonModule into the component's module.
Create the directives
The directive we will be creating is a very basic one. It will just add the classes to the buttons where it is added. We can always bring in more functionalities to buttons by extending the directive.
import { Directive, ElementRef, HostBinding, Input } from '@angular/core';

@Directive({
  selector: '[primary-button]',
})
export class PrimaryButtonDirective {
  @HostBinding('class') get classes(): string {
    return 'button button--primary';
  }
}
import { Directive, ElementRef, HostBinding, Input } from '@angular/core';

@Directive({
  selector: '[secondary-button]',
})
export class SecondaryButtonDirective{
  @HostBinding('class') get classes(): string {
    return 'button button--secondary';
  }
}
Using the directives
We will be using these buttons in the App component itself. So import the ButtonModule in the AppModule to be able to use our new directives.
import { BrowserModule } from "@angular/platform-browser";
import { NgModule } from "@angular/core";

import { AppComponent } from "./app.component";

@NgModule({
  declarations: [AppComponent],
  imports: [BrowserModule, ButtonModule],
  providers: [],
  bootstrap: [AppComponent]
})
export class AppModule {}
In the app.component.html file, we can now start using the directives like so:
<button primary-button>Primary Button</button>
<button secondary-button>Primary Button</button>
As you can see instead of having to look and add multiple classes, we just have to add a single directive and our buttons will be styled consistently.
Benefits of this approach
If the project is big or you are working in a project where there are multiple developers working on the same project, finding the right CSS class names for your buttons can be a difficult task.
The worse thing is that we will be sometimes writing the same CSS styles with a different class name in a different file just because we didn't know that there already exists a class which provides the same styling. This would dramatically increase the amount of CSS in your application making it slower.
If you are using the directive approach, you don't have to worry about finding the class names or worry about consistency. Also, the code would a lot cleaner.
Extending it further
What I have just shown here is just the most basic thing that you can do. But there are a lot of possibilities that you can explore.
Say you have different button sizes, you can easily pass the button size and then get the appropriate button with having to add any classes in your HTML
<button primary-button size="large">Primary Button</button>
<button primary-button size="small">Primary Button</button>
There are a lot of things you can do with this. And directives are just the thing you want to use.
Stay Awesome!